
![Edge AI Loadcell360 [LC360]](https://www.cgvenkateshrajulabs.com/wp-content/uploads/2025/05/code-rainbows-lights-colorful-wallpaper-preview.jpg)
Smart Sensor Instrumentation Meets Edge AI | LoadCell360 Enables Full-Stack Telemetry—from Data Collection to On-Device AI at the Edge , LoadCell360 bridges smart distributed sensing and AI-powered telemetry—delivering real-time data capture, processing, and on-device intelligence across microcontrollers, gateways, and edge platforms.
From signal acquisition to embedded model deployment, it powers full-stack AI pipelines at the edge—enabling scalable, responsive, and efficient decision-making without relying on the cloud.
LoadCell360 (LC360) platform emerges as a cutting-edge AI+IoT-powered Smart Shelf and Frictionless Checkout ecosystem, combining real-time analytics, autonomous inventory tracking, and edge intelligence to redefine the modern retail landscape.
LoadCell360 (LC360): Revolutionizing Retail through Intelligent Shelving and Frictionless Checkout
As digital transformation redefines commerce, LC360 stands at the forefront of intelligent retail systems. This AI+IoT-powered platform enables retailers to manage inventory autonomously, streamline checkout experiences, and unlock actionable insights in real-time—creating a fully adaptive and frictionless shopping environment.
Industry Challenge: Legacy Systems Under Pressure
Traditional retail faces critical inefficiencies:
- Manual Inventory Audits: Time-consuming, error-prone, and reactive.
- Checkout Delays: Account for $38B in walkout-related losses annually.
- Lack of Real-Time Visibility: No live data on shelf status or customer interactions.
- Inflexible POS Infrastructure: Static pricing models and poor personalization.
LC360 Advantage: Digital Twin for Retail Environments
LC360 creates an intelligent, responsive store layout using real-time sensor fusion, edge inference, and cloud-based orchestration.
| Feature | Capability |
| Smart Shelves | Embedded load cells detect SKU movements and weight variations |
| Edge AI Processing | Executes real-time inference to detect anomalies and demand |
| Computer Vision Layer | Barcode-free identification of unpackaged or dynamic SKUs |
| Frictionless Checkout | Supports walk-in/walk-out via NFC/mobile app integration |
| 5G Edge Sync | Ultra-low latency telemetry from shelf to cloud |
Technology Stack
- IoT Load Cells: Sub-gram resolution for item presence/absence tracking
- MQTT + REST APIs: Bi-directional, lightweight telemetry & config updates
- Edge AI Compute: Local model inference eliminates cloud delay
- OTA Firmware: Update-ready via secure HTTP endpoints
- SaaS Admin Console: Aggregates dashboards, alerts, compliance metricsIoT Load Cells: Sub-gram resolution for item presence/absence tracking
- MQTT + REST APIs: Bi-directional, lightweight telemetry & config updates
- Edge AI Compute: Local model inference eliminates cloud delay
- OTA Firmware: Update-ready via secure HTTP endpoints
- SaaS Admin Console: Aggregates dashboards, alerts, compliance metrics
Core Functional Blocks
- ✉ Auto-Replenishment: AI forecasts low stock and triggers restock automatically
- 🧠 Behavioral Intelligence: Tracks shopper gaze, engagement, and dwell time
- ⏳ Checkout Automation: Sub-8s mobile/NFC checkout with no barcode scan needed
- 🔍 Anomaly Detection: Misplaced SKUs, ghost inventory, and out-of-planogram alerts
- 📊 Promo Forecasting: Dynamically measures campaign effectiveness
Strategic Innovations
- Inventory Precision: Detects SKU presence with milligram accuracy
- Supply Chain Integration: Compatible with ERP/WMS and UST OMNI™ sync
- Personalized Commerce: Edge-processed behavior data for real-time offers
- Operational Intelligence: KPI dashboards and audit trails at the shelf level
Impact Metrics
| Performance Metric | Result |
| ⏱ Labor Reduction | Up to 35% fewer manual touchpoints for inventory and checkout |
| 📈 Revenue Lift | Increased conversion via pricing optimization and CX enhancement |
| 📦 Shrinkage Mitigation | 2.2% shrinkage recovery from real-time SKU monitoring |
| 📊 Decision Intelligence | Real-time insights drive data-backed stocking & promotions |
| ♻️ Sustainability Gains | Reduced overstocking and spoilage through precise forecasting |
Deployment Scenarios
- Grocery Chains & Quick Commerce (QSR, 24/7 retail)
- Pharmacies and Health Outlets
- High-Security Merchandise Displays
- Automated Micro-Fulfillment & Dark Stores
- Self-Service Cafeterias, Airports, and Campuses
Why LC360 Outperforms
| Differentiator |
| ✅ Loadcell-first architecture with minimal camera dependency |
| ✅ MQTT + Edge inference ensures rapid and scalable deployment |
| ✅ Full OTA lifecycle management for firmware and calibration |
| ✅ Intelligent dashboards and compliance visualization built-in |
| ✅ Native checkout integration with mobile/NFC ecosystems |

AI + IoT + Cloud Synergy: What Powers LC360
- IoT Load Cells: Detect weight changes and determine SKU removals or placements.
- Computer Vision: Identifies items (including unpackaged ones) without barcode scanning.
- Edge AI: Local compute for real-time alerts, minimizing cloud round-trips.
- 5G: Powers real-time communication across kiosks, mobile apps, and the admin dashboard.
- Admin SaaS Dashboard: Consolidated reporting, price/promo control, and planogram compliance audit.


🔋 Battery Performance Monitoring
Battery Power Trends
Chart: Battery Power (mW) over time
- Power readings mostly range between 290 mW to 320 mW, indicating stable operation.
- Two sharp dips in power output are seen, likely due to momentary current drops, possibly caused by:
- Sensor sleep cycle
- Network connectivity retry
- Power save mode trigger
- Technical Insight:
- Sudden drops correspond with dips in current (mA), while voltage remains relatively constant.
- Suggests current fluctuation is the primary driver for power variation.
Battery Voltage & Current Monitoring
a. Voltage (V) over time
- Stable Range: ~2.60 V to 2.68 V
- Fluctuations: Minor jitter within normal limits, expected due to:
- Sensor activity cycles
- Load variation during transmission
- No signs of voltage sag or over-discharge conditions.
b. Current (mA) over time
- Normal Operating Range: ~115–125 mA
- Dips: Sharp drops seen similar to the power graph—brief declines to ~40–50 mA.
- Interpretation: These are likely linked to scheduled sleep cycles or load dropouts.
Battery % State of Charge (SoC)
Sensor is near depletion or data granularity is limited.
- Sensor is near depletion or data granularity is limited.
- Inaccurate SoC calibration or incomplete charge cycle.
Battery Specs
| Parameter | Value |
|---|---|
| Battery Type | Li-Ion |
| Rated Voltage | 3.7 V |
| Capacity | 10000 mAh |
| Max Current Draw | 3 A |
| Overcurrent Protection | 2–3 A |
| Overcharge Limit | 4.25 ± 0.05 V |
| Over-voltage Limit | 2.45 ± 0.30 V |
| Charging (Standard/Fast) | 0.2C (8h) / 0.5C (2.5h) |
| Operating Temp. Range | -40°C to +85°C |
- Implication: Current readings and voltage fluctuations are within safe operational limits. The battery is far from its stress thresholds.
| Metric | Observed Behavior | Technical Interpretation |
|---|---|---|
| Power Stability | Mostly stable with brief dips | Current dips from sleep/network cycles |
| Voltage | Stable 2.6–2.68V | Well within safe range; no sagging observed |
| Current | Averaging ~120mA; two dropouts | Likely controlled by device power management logic |
| State of Charge | Appears low or unchanging | Needs recalibration or improved telemetry resolution |
| Battery Health | Operating within design tolerances | No signs of overcurrent, overheating, or voltage drift |
Strategic Innovation Layers of LC360
- Behavioral Analytics: Dwell-time, gaze path, interaction frequency used to reposition inventory.
- Supply Chain Sync platform integration enables predictive replenishment and vendor KPI assessment.
- Micro Fulfillment Support: Built to complement back-of-store fulfillment automation and temperature monitoring.
- Risk & Exception Management: AI predicts “next best action” during inventory disruptions or unusual buying patterns.
LC360 = Retail Digital Twin + Smart Inventory Nerve Center + Frictionless Checkout Engine
It’s not just a shelf—it’s the nexus of real-time inventory, behavior-driven pricing, autonomous checkout, and AI-powered analytics.
LC360 Smart Shelf – An IoT-enabled Intelligent Inventory Management Solution
The Smart Shelf is an advanced IoT-driven solution equipped with intelligent sensors and smart scales embedded within shelves, pallets, racks, and refrigerators. This innovative technology automatically detects and monitors product inventory in real-time, using precise weight sensing to track item availability and consumption patterns.
Core Functionalities:
- Auto-Replenishment: Automatically senses low inventory levels and triggers reordering or notifications to avoid stock shortages.
- Intelligent Monitoring: Continuously tracks stock status to prevent out-of-stock situations.
- Cashier-Less Checkout: Enables seamless, automated checkouts by allowing customers to walk in, select items, and leave without human interaction.
- Real-time Inventory Updates: Provides instant updates to inventory data, improving logistics and reducing restocking delays.
- Data-Driven Retail Analytics: Employs AI-driven predictive analytics to provide insights on consumer behavior, optimizing product placement and marketing strategies.
- Customizable Dashboards: Offers personalized real-time monitoring interfaces for immediate decision-making and efficient store management.
Technical Specifications:
- Battery Operated: Low-power design supporting micro-USB or battery-powered operation, providing extended runtime with up to 10 hours of backup.
- MQTT Communication Protocol: Devices communicate via secure MQTT and RESTful bridges, subscribing and publishing to dynamic topics for bidirectional data flow.
- Device State Management: Supports multiple operational modes (Setup, MQTT Config, Monitor) indicated by LED status (ON, blink on weight change, or fast blinking for OTA).
- Advanced Calibration and Commands: Supports calibration through JSON-based commands for sample rate, difference threshold, per-item weight, and OTA firmware updates.
- OTA Firmware Updates: Over-the-air updates supported using HTTP endpoints for firmware bin files.
- Diagnostic and Debugging: Real-time MQTT-based diagnostics with command-response workflows (e.g., DUMP, VERSION?, RCF, STIME, DIFF, OK_W, etc.).
- Security Features: Device state is protected through structured setup and MQTT command sequences ensuring robust operation in dynamic environments.
- Heartbeat and Wake Cycle: Devices are designed to wake periodically (e.g., every 12 hours) for MQTT maintenance tasks even in low-power states.
- Accurate Loadcell Monitoring: Inclined loadcell placement is supported with recalibration routines ensuring reliable weight tracking.
System Architecture Diagram:


LC360 is a next-generation IoT-based shelf system designed for real-time inventory tracking and environmental sensing in modern retail and cold-chain environments. Built on high-accuracy single-point load cell technology and integrated with wireless data transmission, this AI-ready platform transforms static shelving into dynamic intelligence hubs.
Key Features
- High-Precision Load Cell: 20kg capacity with 1g resolution; HX711 24-bit ADC for ultra-precise weight detection.
- Multi-Sensor Integration: Embedded temperature (-40°C to +85°C, ±3°C accuracy) and humidity (10–99%, ±3–5% accuracy) sensors.
- Wireless Telemetry: ARM-Core with 2.4GHz Wi-Fi module using MQTT protocol (broker.hivemq.com, port 18xx).
- Digital Twin Ready: Enables real-time monitoring and AI-driven insights for retail automation.
- OTA Updatable: Remote firmware updates and configuration over-the-air using secure MQTT channels.
Smart Shelf Capabilities
- Remote tare and calibration functionality
- MQTT-based custom payloads for health checks, configuration, and command triggers
- Real-time push notifications on weight anomalies or environmental drift
- Integration-ready with Home Assistant and other edge AI dashboards
Architecture & Components
| Component | Details |
| Load Cell | Single-point, strain-gauge type, 20kg, ±0.2% accuracy |
| Microcontroller | ESP32 + CSU18MX88 (LQFP48) controller |
| Communication Protocol | MQTT over Wi-Fi (2.4GHz, IEEE 802.11b/g/n) |
| Calibration Interface | UART2 + light touch button input + RGB LED status system |
| Enclosure | ABS + galvanized steel; IP67-rated; 23″x14″ platform |
| PCB Components | HX711 ADC, Wi-Fi module, LDO regulators, Type-C interface |
Deployment & Setup
- Power: USB-C (Type-C) with fast charge support and low power standby
- Connectivity: Supports up to 70 smart shelves per Wi-Fi router
- MQTT Topics:
- Subscribe: /NODE/{unique_id}/SUB
- Publish: /NODE/{unique_id}/PUB
- Calibration: Multi-point calibration at 0, 3kg, 10kg, 20kg; indicated by LED sequence
Enterprise Deployment & Network Integration guideline LC360 | Wi-Fi + MQTT Connectivity
Network Environment Validation
Before deployment, determine if the client’s gateway is:
- SOHO-based or Enterprise-managed
- If Enterprise, capture and validate:
- DHCP lease configurations
- FIREWALL rules and open ports
- VLAN definitions and Traffic shaping policies
- NAT configurations and port forwarding rules (if MQTT broker is hosted externally)
Note: All smart shelf components require unimpeded MQTT communication over port 1883 and 2.4 GHz Wi-Fi access.
VLAN & Subnet Configuration
- Ensure the Smart Gondola, MQTT broker, Wi-Fi AP, and Android provisioning device reside on the same subnet.
- If VLAN segmentation exists:
- Set up inter-VLAN routing to enable bi-directional MQTT communication.
- Hook Smart Gondola topology into the existing VLAN with link-aggregation and policy-based access control (PBAC).
RF Coverage & Stickiness Validation
Perform RF and client stickiness tests post-SSID configuration:
- Configure SSID (2.4GHz) for IoT device onboarding.
- Validate signal strength and consistent client reassociation behavior in various zones.
- Use tools like WiFi Analyzer / Ekahau for heatmapping.
Recommendation: Use CAT6E+ cabling for all PoE-supported Wi-Fi APs.
MQTT Configuration & Device Topics
- Each Smart Gondola communicates over MQTT protocol.
- Devices wake from sleep every 60 seconds by default (modifiable via OTA).
MQTT Broker Setup:
- Broker IP/URL: internal IP
- Port: Dynamic Range
Topic Format:
- Subscription topic: /NODE/<LC360-ID>/PUB
Example: /NODE/LC360-22334455/PUB
Used for receiving telemetry from the device. - Publish topic: /NODE/LC360-22334455/SUB
Example: /NODE/ LC3456777888/SUB
Used for sending control commands (e.g. Remote calibration, FOTA-UPDATE, Turn-ON/OFF-Configurable-Heartbeats,TinyML -Sensor-Analytics,etc..).
Customer Validation Testbed Replication & Pre-Provisioning
Replicate client-side network in your lab to validate:
- DHCP leases and IP mapping
- VLAN propagation and routing
- Wi-Fi SSID beaconing and channel bandwidth (20/40 MHz)
- MQTT topic communication integrity
- Dry-run edge server reachability tests
Topology snapshot
- PoE & Port Status: Validated and tagged for shelf connectivity
- RADIUS/AAA: If applicable, export and review CHAP/EAP handshake logs
- Auth + Network Logs: Review show running-config, DHCP, and firewall logs
- Ensure hostapd is broadcasting the SSID correctly for initial provisioning

FOTA Workflow

Customizable Dashboard Features:
- Real-time item count and weight display
- MQTT topic monitor (PUB/SUB)
- Battery level and environmental sensor readouts (temperature, humidity)
- Alerts on abnormal weights or low inventory
- OTA update interface for firmware management
- Historical data charting and trends (per shelf, product, SKU)
Significance and Benefits:
- Enhanced Customer Experience: Reduces checkout times significantly, providing a streamlined, frictionless shopping experience.
- Operational Efficiency: Optimizes stock management, reduces manual inventory checks, and minimizes human errors.
- Sustainability: Contributes to waste reduction and lower carbon footprints through precise inventory management.
- ROI Improvement: Increases sales opportunities via predictive inventory management, targeted promotions, and improved customer insights.
- Data-Driven Decisions: Provides invaluable consumer behavior analytics, facilitating strategic decisions on merchandise stocking, placement, and promotional activities.
Applications:
This solution is ideal for various retail environments including supermarkets, convenience stores, pharmacies, and specialty shops, where efficient inventory management, seamless customer interactions, and robust data analytics significantly impact profitability and customer satisfaction.
By integrating this Smart Shelf technology, retailers gain a competitive edge through enhanced operational efficiency, elevated consumer satisfaction, and actionable data insights for strategic growth.
Deployment Scenarios
• Grocery Chains & Quick Commerce (QSR, 24/7 retail)
• Pharmacies and Health Outlets
• High-Security Merchandise Displays
• Automated Micro-Fulfillment & Dark Stores
• Self-Service Cafeterias, Airports, and Campuses
Why LC360 Outperforms
✅ Loadcell-first architecture with minimal camera dependency
✅ MQTT + Edge inference ensures rapid and scalable deployment
✅ Full OTA lifecycle management for firmware and calibration
✅ Intelligent dashboards and compliance visualization built-in
✅ Native checkout integration with mobile/NFC ecosystems
Digital Twin for Retail: How LC360 is Transforming the Shopping Floor into an Intelligent Ecosystem
In today’s fast-evolving retail landscape, traditional systems are being outpaced by consumer expectations for speed, accuracy, and personalization. With manual inventory audits, long checkout queues, and disconnected point-of-sale systems creating bottlenecks, retailers need a smarter, leaner, and more automated infrastructure.
Enter LoadCell360 (LC360)—a next-generation AI+IoT-powered Smart Shelf and Frictionless Checkout ecosystem. More than just an upgrade to existing infrastructure, LC360 functions as a Digital Twin for the retail environment, enabling real-time decision-making, autonomous operations, and actionable intelligence at the shelf level.
The Legacy Challenge
- Manual Inventory Audits: Reactive and error-prone processes that delay replenishment.
- Checkout Delays: Result in over $38B in walkout-related losses annually.
- No Real-Time Visibility: Lack of shelf-level data leads to poor replenishment decisions.
- Static POS Infrastructure: Limited capability for dynamic pricing or personalized engagement.
The LC360 Advantage: A Digital Twin for Every Aisle
| Feature | Capability |
| Smart Shelves | Embedded load cells detect SKU movements and weight changes |
| Edge AI Processing | Runs local inference to detect shelf events and anomalies |
| Computer Vision Layer | Barcode-free identification of unpackaged or dynamic SKUs |
| Frictionless Checkout | Walk-in, walk-out experience with mobile/NFC integration |
| 5G Edge Sync | High-speed data relay from shelf sensors to cloud analytics |
LC360 Technology Stack
- IoT Load Cells: Sub-gram detection for precise inventory tracking
- MQTT + REST APIs: Lightweight, bi-directional messaging
- Edge AI Compute: Enables low-latency decision-making at the shelf
- OTA Firmware Updates: Remote, secure upgrades with zero disruption
- SaaS Admin Console: Custom dashboards, planogram compliance, analytics
Core Functional Blocks
- ✉ Auto-Replenishment: Predictive restocking based on live consumption trends
- 🧠 Behavioral Intelligence: Tracks customer gaze, engagement, and dwell time
- ⏳ Checkout Automation: Enables <8-second, barcode-free self-checkout
- 🔍 Anomaly Detection: Flags misplaced SKUs, ghost inventory, and planogram issues
- 📊 Promo Forecasting: Evaluates promotional effectiveness in real time
Strategic Innovations
- Milligram-Accuracy Inventory Detection
- ERP/WMS Integration & UST OMNI™ Compatibility
- Real-Time Behavioral Commerce
- On-Shelf KPI Dashboards and Audit Trails
Security & Reliability
- Firmware-locked controller for IP protection
- Secure OTA protocol and proprietary MQTT payload schema
- Full traceability via device UUID and communication logs
Compliance & Validation
- Drop, splash, and vibration tested to withstand retail environments
- Continuous 48–72 hour putback/pickup endurance validated
- IP67 moisture resistance coating on fully populated PCBs
Impact Metrics That Matter
| Metric | Result |
| ⏱ Labor Reduction | Up to 35% fewer manual interventions for inventory and checkout |
| 📈 Revenue Lift | Improved conversion via dynamic pricing and smoother CX |
| 📦 Shrinkage Mitigation | 2.2% revenue recovered through real-time SKU tracking |
| 📊 Decision Intelligence | Data-driven replenishment and merchandising strategies |
| ♻️ Sustainability Gains | Minimized spoilage and overstock through accurate demand prediction |
Deployment Scenarios
- Grocery Chains & Quick Commerce (QSR, 24/7 retail)
- Pharmacies and Health Outlets
- High-Security Merchandise Displays
- Dark Stores and Micro-Fulfillment Centers
- Self-Serve Cafeterias, Airports, and Campuses
Why LC360 Outperforms
- ✅ Loadcell-first architecture with minimal camera dependency
- ✅ MQTT-based architecture enables scalable, event-driven updates
- ✅ OTA lifecycle support for full remote device management
- ✅ Rich analytics dashboards with built-in compliance visualizations
- ✅ Seamless checkout integration with NFC and mobile wallet ecosystems
Final Thought
LC360 isn’t just a shelf—it’s your store’s neural network. By acting as a real-time digital twin, LC360 connects sensors, intelligence, and systems to deliver unmatched retail agility. It closes the loop between what customers do, what the system sees, and how the store responds.
Ready to power your store with real-time retail intelligence?
Let’s build the future—one smart shelf at a time.
Conclusion
LoadCell360 (LC360) is more than a sensorized shelf—it’s a digitally intelligent orchestration engine for real-time, adaptive retail. By replacing reactive audits with autonomous, cloud-aware intelligence, LC360 unlocks new levels of efficiency, responsiveness, and profitability.
Let’s build the future of retail—one intelligent shelf at a time.
IOT Shelves Configuration and Calibration Manual
Contents
Basic Requirements for IoT weighing scale placement 2
Section 1: Device Wi-Fi and MQTT Configuration. 5
Section 2: Firmware Update-Manual Method. 9
Section 3: Weight Calibration using MQTT Explorer. 11
Section 4: Update Firmware and Weight Calibration using FOTA Method. 16
Section 1: Basic Requirements for IoT weighing scale placement
1. Stable Surface:
Place the weighing scale on a stable and flat surface to ensure accurate measurements. Uneven or soft surfaces can lead to inaccurate readings.
2.Level Ground:
Ensure that the surface where the scale is placed is level. You can use a spirit level to confirm this. A level surface prevents tilting, which can affect the measurement accuracy.
Suggested Material:
universal High Precision Small Level Bubble, Tripod Level Meter Circular Bubble for Telescope, Professional Measuring (DMHB-4-12)]


3.Ventilation:
Ensure that the scale is not obstructed by any objects, walls, or curtains that could restrict airflow. Proper ventilation prevents temperature and humidity fluctuations that may affect measurements.
4.Away from Vibrations:
Keep the scale away from sources of vibrations, such as heavy machinery, foot traffic, or appliances like washing machines. Vibrations can interfere with measurements.so we need to use Anti vibration pads.
Suggested Material:
XCEL Value Pack, Neoprene Foam Anti Vibration Pads with Adhesive 6 in X 6 in X 1/8 in, Shock Absorbing Material, Made in USA (8 Pieces)
5.Wi-Fi Signal Strength:
IoT weighing scales require a stable Wi-Fi connection for data transmission. Ensure that the scale is placed within the range of your Wi-Fi network and that the signal strength is adequate.
6.Accessibility:
Make sure the scale is easily accessible for users. It should be placed at a convenient height and location
7.Protection from Moisture:
Avoid placing the scale in areas prone to moisture, such as bathrooms, as moisture can damage the scale’s electronics.
8.Calibration:
Follow the manufacturer’s instructions for calibrating the scale if necessary. Calibration ensures accurate measurements.
9.Regular Maintenance:
Periodically clean and inspect the scale to ensure it remains in good working condition. Dust and debris can affect the scale’s accuracy over time.
10.Weight Limit:
Be aware of the scale’s weight limit and avoid exceeding it to prevent damage to the scale.
11.Safety: If the scale is being used in a commercial, consider safety regulations and guidelines for scale placement.
Section 2: Device Wi-Fi and MQTT Configuration
1.Check Device Power:
• If the device is not ON, press and release the reset button (inward button)
• If the Load cell shows a green light, perform a long press on the config button (outward button) until it turns into a sky-blue light.


• We can verify the MAC Id from the backside of Device.
The IoT sensor has a multifunctional LED in the Front Middle.
The LED indicates the following states during installation & working:
Green: It’s in ready state
Blue: It’s in Calibration Mode, so we need to calibrate the Weight scale, before that you need to Update the firmware if required.
Static Cyan: It’s in Configuration Mode, IoT board not connected to AP
Dynamic Cyan: it’s not in working state
Green & Intermittent Red: Battery has low power; we need to put it in charging Mode.
• DIP switch Settings: Ensure Dual Inline Package (DIP) switch settings as shown below.

The DIP switch is used to configure various settings or options for the device. Each switch corresponds to a specific parameter or feature, and its position (ON or OFF) determines the setting.
2.Configure Wi-Fi:
• Open the Computer’s Wi-Fi settings and view available networks.

3.Wi-Fi Configuration:
• Click on “Configure Wi-Fi” option, which will display a list of available networks.

• Select the desired Wi-Fi network (SSID) and enter password.

• Also, enter the MQTT (Message Queuing Telemetry Transport) IP address.

4.Restart Device:
•It will try to connect Access point if it’s not done, please do same steps again
Section 3: Firmware Update by Manual Method
1.Firmware Update:
• locate the “Update” button on the device (as shown in the picture) on your

2.Access the Firmware Update Webpage:
•Click on the “Update” button, which will lead you to a webpage for firmware updates
3. Select Bin File and Update:

• On the webpage, select the appropriate firmware bin file.
If the device is not connected to a Wi-Fi network, you can access it using the default IP address: http://192.168.4.1.
• Click the “Update” button on the webpage to initiate the firmware update process.

LED lights indicate a green color, which means it’s connected to your access point. If not done again, verify your Wi-Fi settings and MQTT details.
Section 4: Weight Calibration using MQTT Explorer
Based on the provided steps, here is a summary of the process for configuring Digit Self using MQTT software:
Step 1: Install MQTT Software on Your Local System
Download and install MQTT client software on your local system. There are various MQTT clients available for different operating systems.
Step 2: Connect to MQTT Broker
Open the installed MQTT client and change the MQTT broker’s host to 192.168.11.211 and the port number to 1883.
Click the “Connect” button to establish a connection to the MQTT broker.

Step 3: Restart Digit Self
Press the “Restart” button on your Digit Self device’s right side, and it should display a sky blue color indicating it is ready for configuration.
Step 4: View Topic Names in MQTT Explorer
In your MQTT client, navigate to the MQTT explorer or topic list section to view the topic names.

Step 5: Change Topic Name and Select “Raw” Options
In the MQTT explorer, change the topic name to the specified “digitself topic name/SUB.”
Select the “raw” option for that topic.

Step 6: Send “ZERO_W” Command
In the “raw” section of the MQTT client, type and select the “ZERO_W” command and choose the “public” option. This will send the command to the specified topic on the right side of the MQTT explorer.
+++
Step 7: Send “LC_CONFIG” Command
In the “raw” section of the MQTT client, type and select the “LC_CONFIG” command and choose the “public” button. This will send the command to the specified topic on the right side of the MQTT explorer.

Step 8: Set Weight on Digit Self
Place a weight of 500g (Reference Weight) on the Digit Self device.

Step 9: Send “OK_W” Command
In the “raw” section of the MQTT client, type and select the “OK_W” command and choose the “public” button. This will send the command to the specified topic on the right side of the MQTT explorer.

Step 10: Observe Green Color on Digit Self
After completing the “OK_W” command, the Digit Self should show a green color, indicating that the weight calibration is successful.

Step 11: Click “Publish” Button
Click on the “Publish” button on the left side of the MQTT explorer.
Step 12: Check Weight Display on Digit Self
Observe the weight displayed on the Digit Self. It should show a green color box with the current weight as 502g and the previous weight as 0g (calibrated with 500g).

Step 13: Configuration Success
With the above steps completed, the Digit Self device is successfully configured using MQTT commands.
Section 5: Update Firmware and Weight Calibration using FOTA Method
Based on the instructions provided, here is a step-by-step guide on how to proceed:
Step 1: Launch the Mesh Provisioning Script and Enter MQTT Server IP: PORT Details
• Open a terminal or command prompt on your system.
• Navigate to the directory where the mesh provisioning script is located.

• Run the script and provide the required MQTT server IP and PORT details when prompted.
Step 2: install apache server on your Ubuntu system
I. Open a terminal:
Press Ctrl + Alt + T to open a terminal window on your Ubuntu system.
ii.Update package information: Before installing any software, it’s good practice to update the package list to get the latest information from the repositories. Enter the following command:
sudo apt update
iii.Install Apache: Once the package information is updated, you can install the Apache web server using the following command:
sudo apt install apache2
iv. Start Apache: After the installation is complete, Apache should start automatically. If it’s not running, you can start it manually with the following command:
sudo systemctl start apache2
v.Enable Apache to start on boot: To ensure that Apache starts automatically whenever you boot your system, use the following command:
sudo systemctl enable apache2
vi.Check Apache status: You can verify whether Apache is running by checking its status:
sudo systemctl status apache2
vii.Configure firewall (if needed): If you have a firewall running on your system, such as ufw, you may need to allow HTTP traffic (port 80) for Apache. Use the following command to enable it:
sudo ufw allow Apache
viii.Test Apache: Open a web browser and enter your server’s IP address or hostname in the address bar. You should see the default Apache page indicating that Apache is installed and running.
Apache web server should now be installed and running on your Ubuntu system. You can start adding your web content to the appropriate directories under /var/www/html/ to serve your website through Apache.

Step 3: Point to Binary File Location
• After the script is running and connected to the MQTT server, it will present you with a list of Load Cells (LCs) that can be upgraded.

• Follow the script’s instructions to select the LCs that need to be upgraded.
- Install Apache Server on your system, locate following path and create folder name as bin, paste your firmware file as bin format.


• When prompted, provide the location of the binary firmware file that contains the upgrade for the Load Cells.

- Select the list of LCs that need to be upgraded and point to the binary file location, then select BULK OTA it will start provisioning the LOADCELLS concurrently!!
Step 3: Initiate BULK OTA Upgrade
• Once you have selected the Load Cells for upgrade and specified the binary file location, you may be prompted to initiate the BULK OTA upgrade.
• Confirm your selection to start the concurrent provisioning of the Load Cells with the new firmware.
Step 4: Monitor FOTA Start Time and SYS_START_TIME
• During the OTA upgrade process, the script should display the FOTA start time or activation timestamp for each Load Cell being upgraded.
• After the successful completion of the upgrade, you should be able to see the SYS_START_TIME for each upgraded Load Cell.

Step 5: Send Remote Weight Calibration Payload on Respective LC Window Prompt
• After the OTA upgrade is complete, the script may prompt you to send weight calibration commands for each Load Cell.
• Follow the instructions and send the commands as mentioned in the prompt:
Commands to send from this tab:
- ZERO_W: For weight tearing, send this command. The LED state changes to BLUE blinking state, and you should wait for the GREEN blinking state as instructed.
- LC_CONFIG: Place the weight that needs to be calibrated.

- W: xxx: Replace ‘xxx’ with the weight value that you want to calibrate (e.g., W:1000 for a weight of 1000).

- OK_W: The script should echo the calibrated weight on the terminal.
Step 6: Observe Raw file with Weight Change State
After completing the weight calibration steps, the script should start displaying messages with weight change states for the respective Load Cells.

Now you can place different weights of products; it will show the actual weight trigger if not happened or it gives the false weights, you should do the calibration again using calibration commands.
Recently, we got an updated version of firmware for the IoT Shelf. Once you’ve done all the steps,
We need to set thresholds for gondola shelves and cooler shelves using the following commands:
Ex: SET_THW:25 i.e., grams (for Gondola)
Ex: SET_THW:50 i.e., grams (for Cooler)–
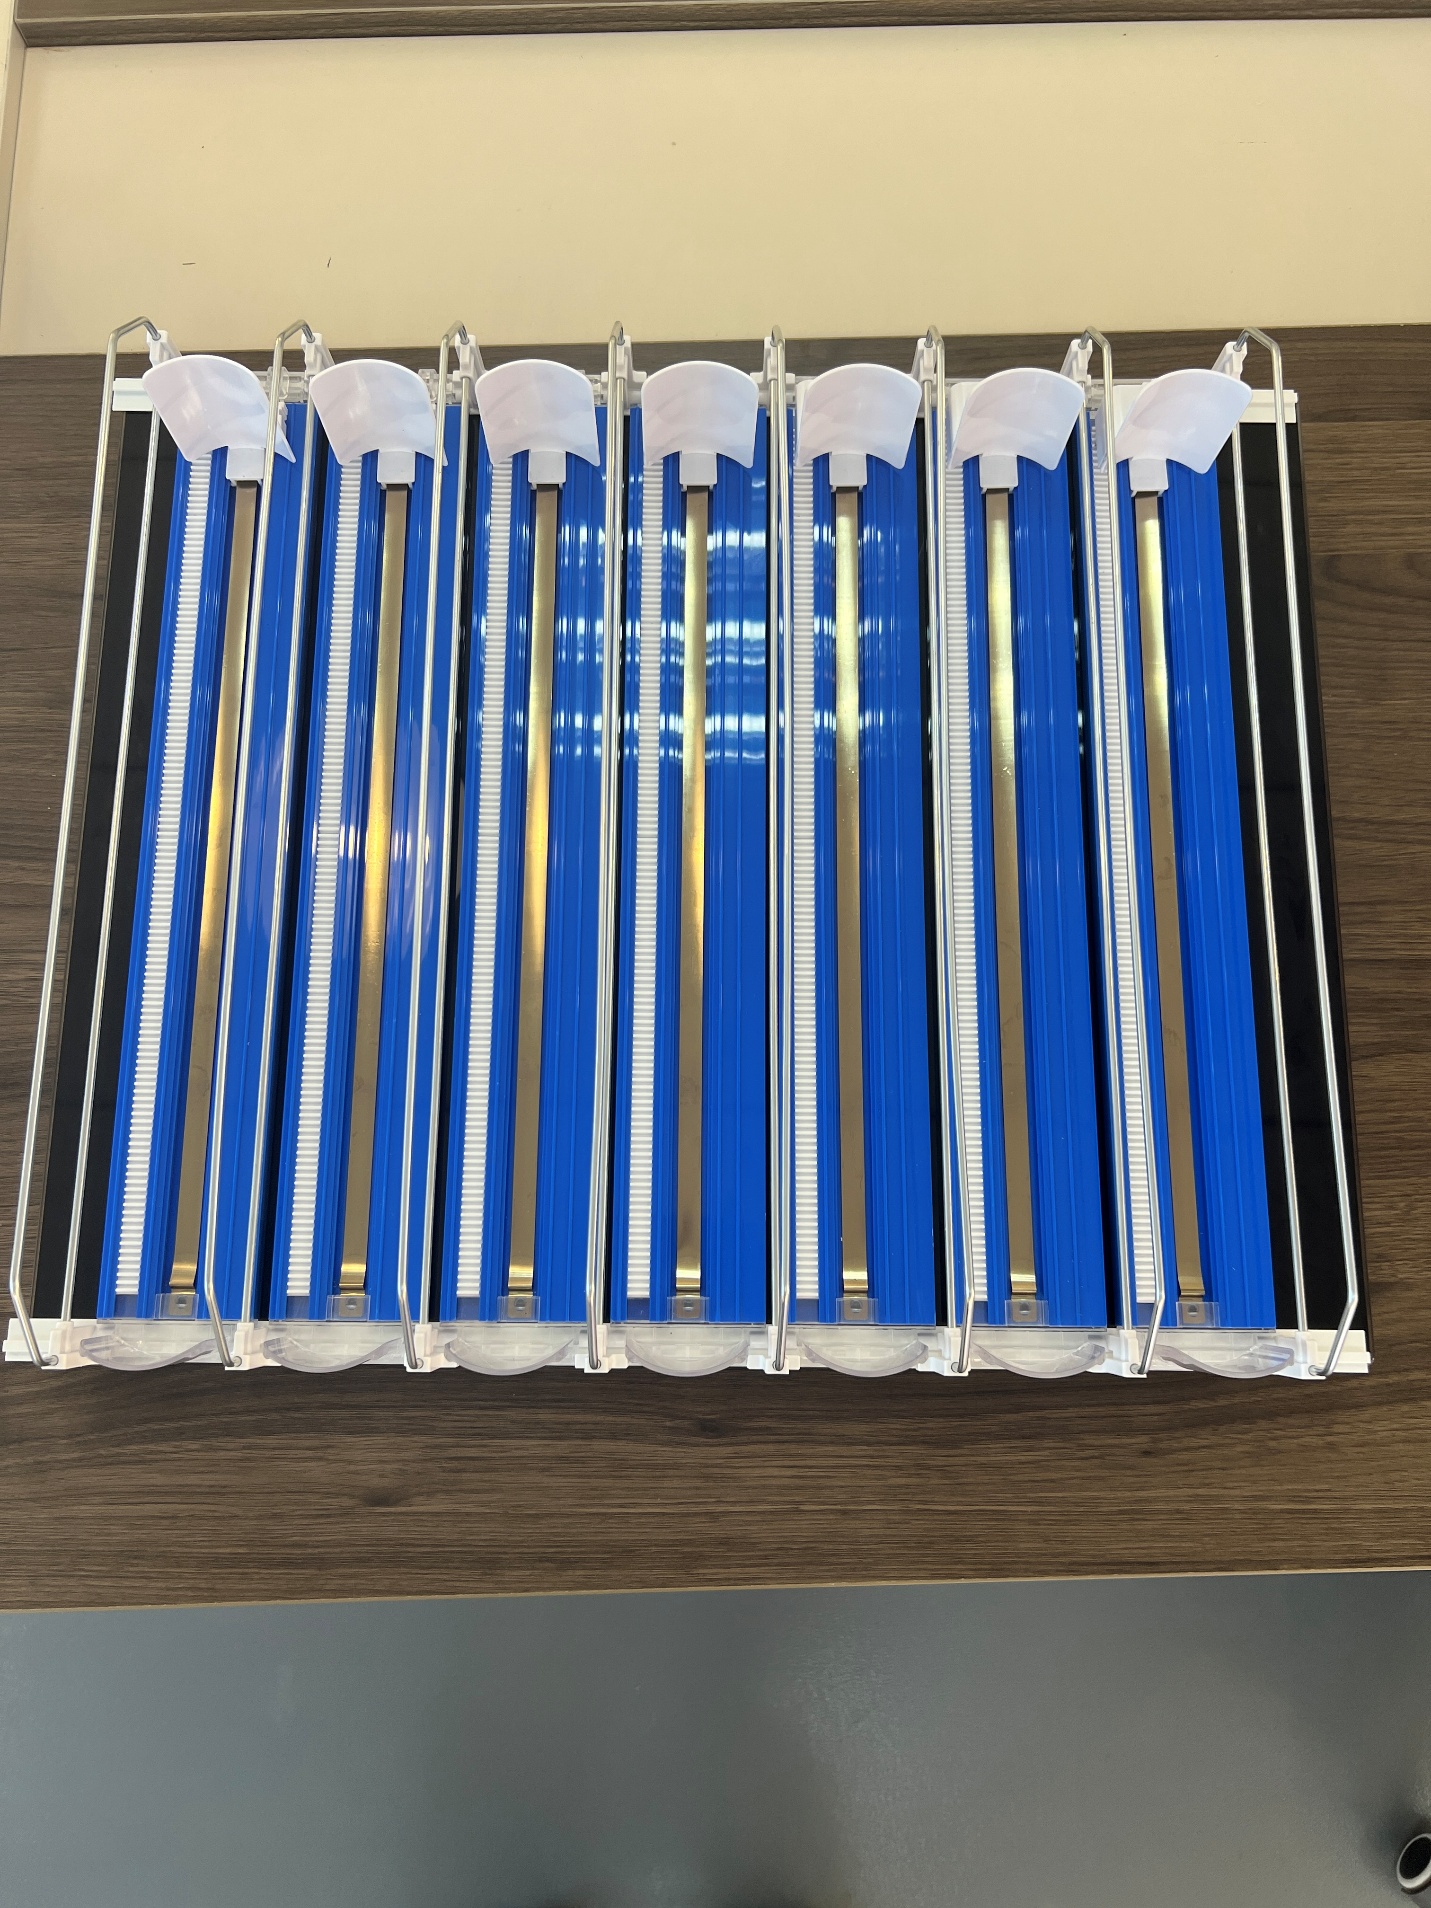
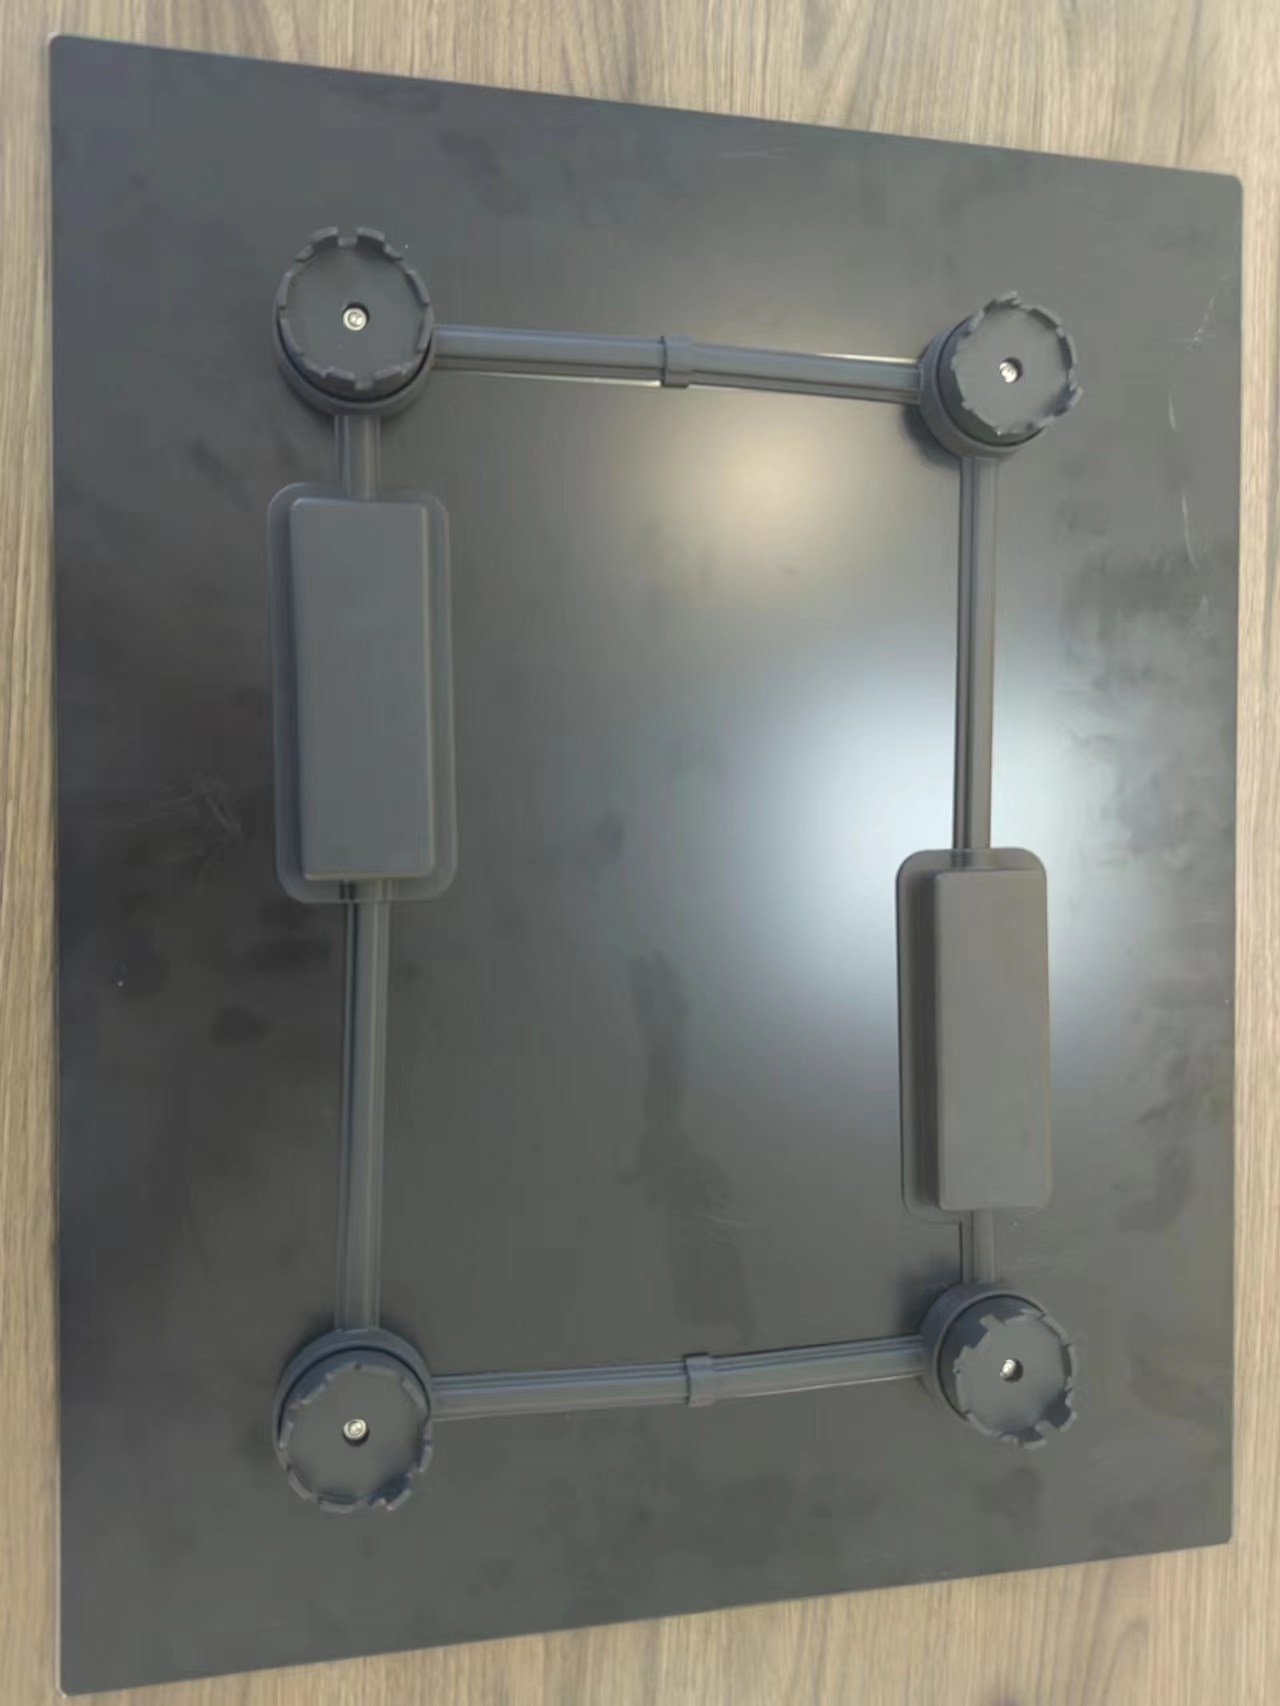
In my role as an R&D Innovator and Systems Architect supported by extensive experience leading global, multilingual hardware engineering teams I served as the principal engineer responsible for the end-to-end conception, design, and patenting of the complete hardware architecture for the Pusher Load-Cell Platform. I authored the full system blueprint, including sensor pathways, signal-conditioning topology, embedded control architecture, safety envelopes, reliability models, and manufacturability constraints, ensuring a fully scalable and production-ready design.
Beyond architecture development, I also established the comprehensive quality control and validation framework that became the foundation of the Shenzhen manufacturing group’s mass-production workflow. This framework encompassed component qualification matrices, calibration algorithms, tolerance band definitions, Manufacturing Validation Tests (MVT), environmental stress and burn-in protocols, and long-duration reliability screening. These processes were seamlessly integrated into the factory’s volume-production pipeline, enabling consistent high-yield output while maintaining enterprise-grade precision, durability, and operational stability.
Through this combined architectural and operational stewardship, I bridged R&D innovation with real-world manufacturability delivering a robust hardware platform, a scalable QC ecosystem, and a globally aligned production model that accelerated time-to-market while elevating overall hardware quality and reliability.

Spearheaded the end-to-end blueprint for a Shanghai hardware production partner to stand up an EVT/DVT/MP engineering validation test jig for load cells and optional ADC/amplifier assemblies delivering production-ready specs for rigid side-load–controlled fixturing, automated test flows, full traceability, and standardized calibration procedures.
The Pusher Load-Cell System integrates mechanical force sensing, optical motion tracking, digital signal processing, and edge-level intelligence into a unified measurement and analytics platform. When the pusher applies compression to the target object, the resulting force is transmitted to the load cell, which outputs an analog signal proportional to displacement and pressure. This analog signal passes through the amplifier and is conditioned for accurate measurement before being forwarded to the MCU. In parallel, an optical encoder with optocoupler isolation captures rail movement, linear displacement, or product-count pulses, sending a clean digital signal directly into the MCU. The MCU fuses analog load-cell data with the encoder’s optical motion data and forwards the combined telemetry via MQTT/SPI to the Edge AI module. Edge AI performs high-resolution inference, calculates RPM/linear speed, and executes Anomaly Detection models to identify deviations in force curves, movement signatures, or mechanical behavior. The cleaned and enriched telemetry also returns feedback to the pusher subsystem for closed-loop real-time control. Pusher → Load Cell → Amplifier → MCU → Edge AI → Anomaly Detection, with the Optical Encoder feeding the MCU directly for synchronized positional and force analytics.
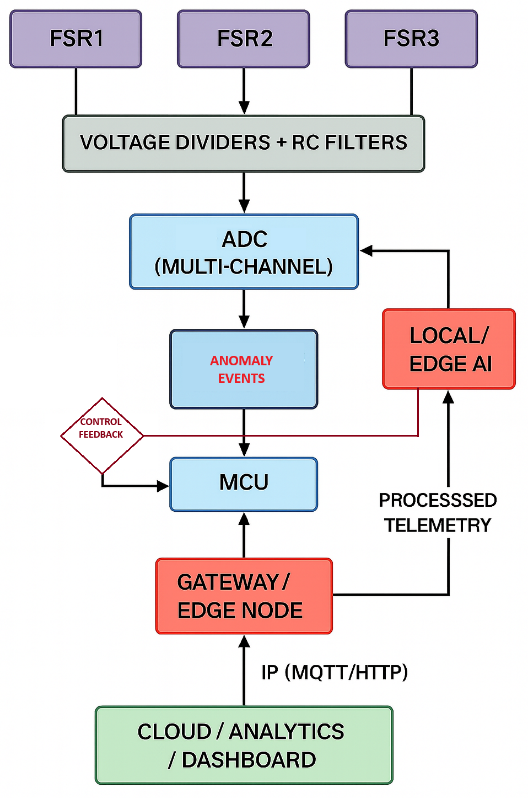
Multi-Channel FSR Load-Sensing Platform With Edge Intelligence and Anomaly Detection
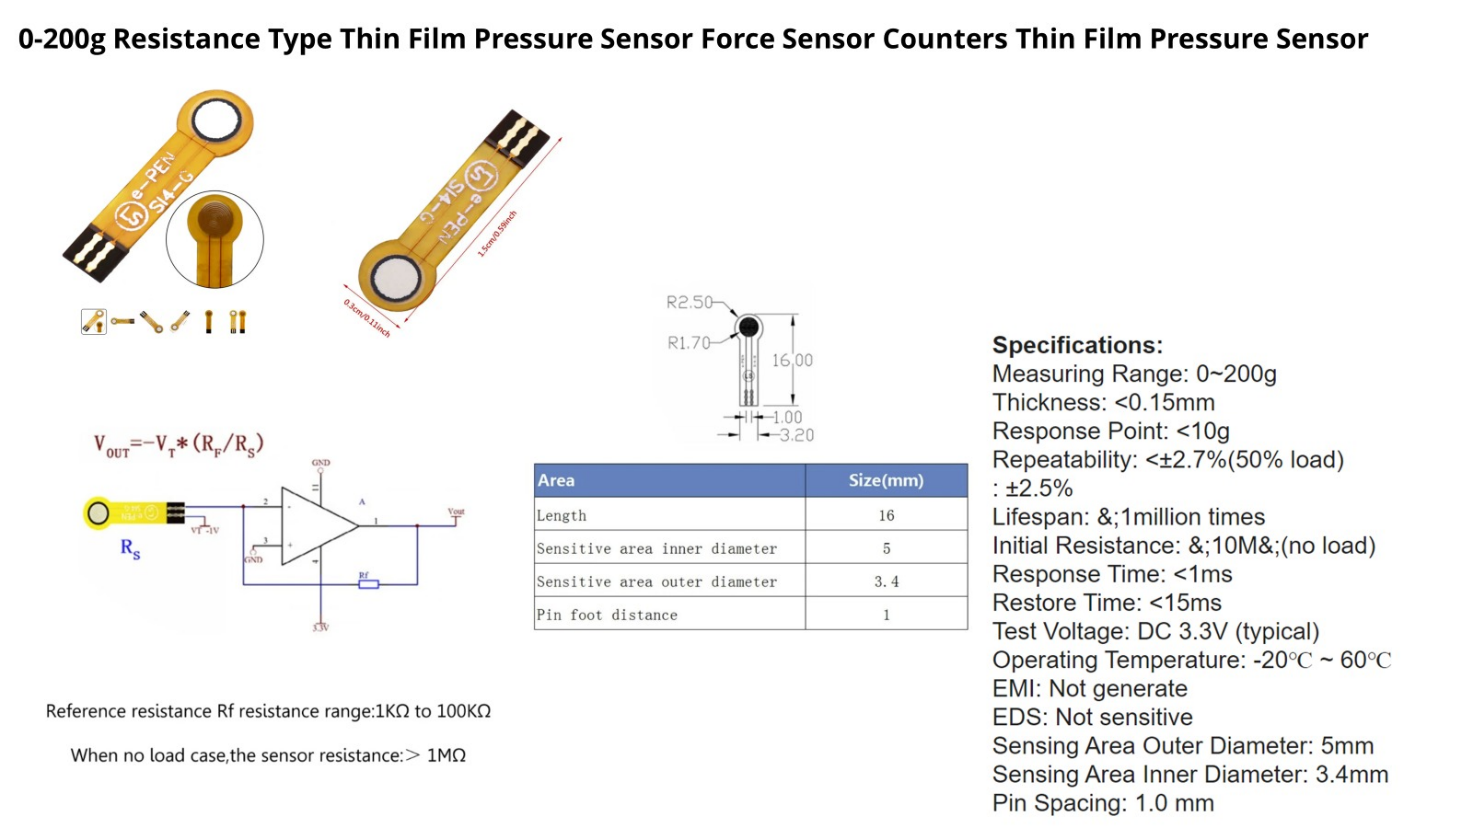
The multi-channel FSR platform delivers a complete, extensible sensing infrastructure that spans the entire pipeline from analog force acquisition to edge-level intelligence and cloud-based analytics. At its foundation, an array of force-sensitive resistors (FSR1–FSR4) converts applied pressure into proportional resistance changes ranging from about 10 MΩ at no load to roughly 200 Ω under high force with an actuation threshold of 0.2–0.5 N that enables responsive, high-resolution load detection. These nonlinear resistance profiles are conditioned through a dedicated analog front-end that employs precision voltage-divider networks, optional RC filtering, and op-amp stages to generate stable 0–Vref analog voltages for accurate digitization. A microcontroller-based data acquisition layer samples all channels through integrated or external multi-channel ADCs, performing essential preprocessing such as noise filtering, baseline correction, normalization, event detection, and multi-point pressure mapping. An optional embedded Edge-AI module augments this pipeline with lightweight anomaly-detection and pattern-recognition algorithms capable of identifying abnormal pressure signatures, sensor drift, mechanical misalignment, and early-stage failure modes in real time. The platform supports secure upstream telemetry through UART, I²C, SPI, Ethernet, Wi-Fi, or LTE gateways using protocols such as MQTT or HTTPS, enabling scalable device connectivity. At the cloud or on-premise layer, long-term analytics including calibration-drift tracking, multi-sensor correlation, behavioral trend analysis, and fleet-wide device health scoring are visualized through a configurable dashboard offering both real-time and historical insights. Overall, this architecture provides a robust, adaptable solution suitable for industrial automation, robotics, medical devices, smart manufacturing, and high-precision research environments, where accurate pressure monitoring, real-time anomaly detection, and comprehensive telemetry are mission-critical
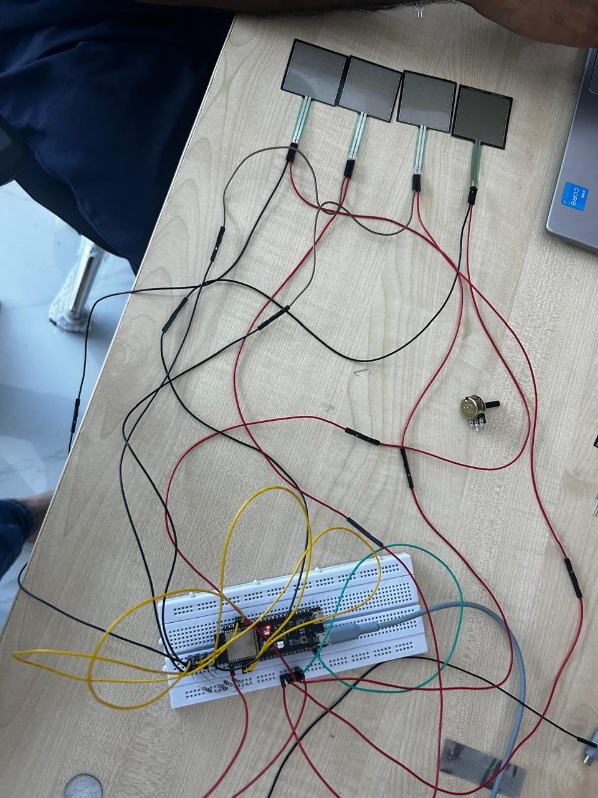
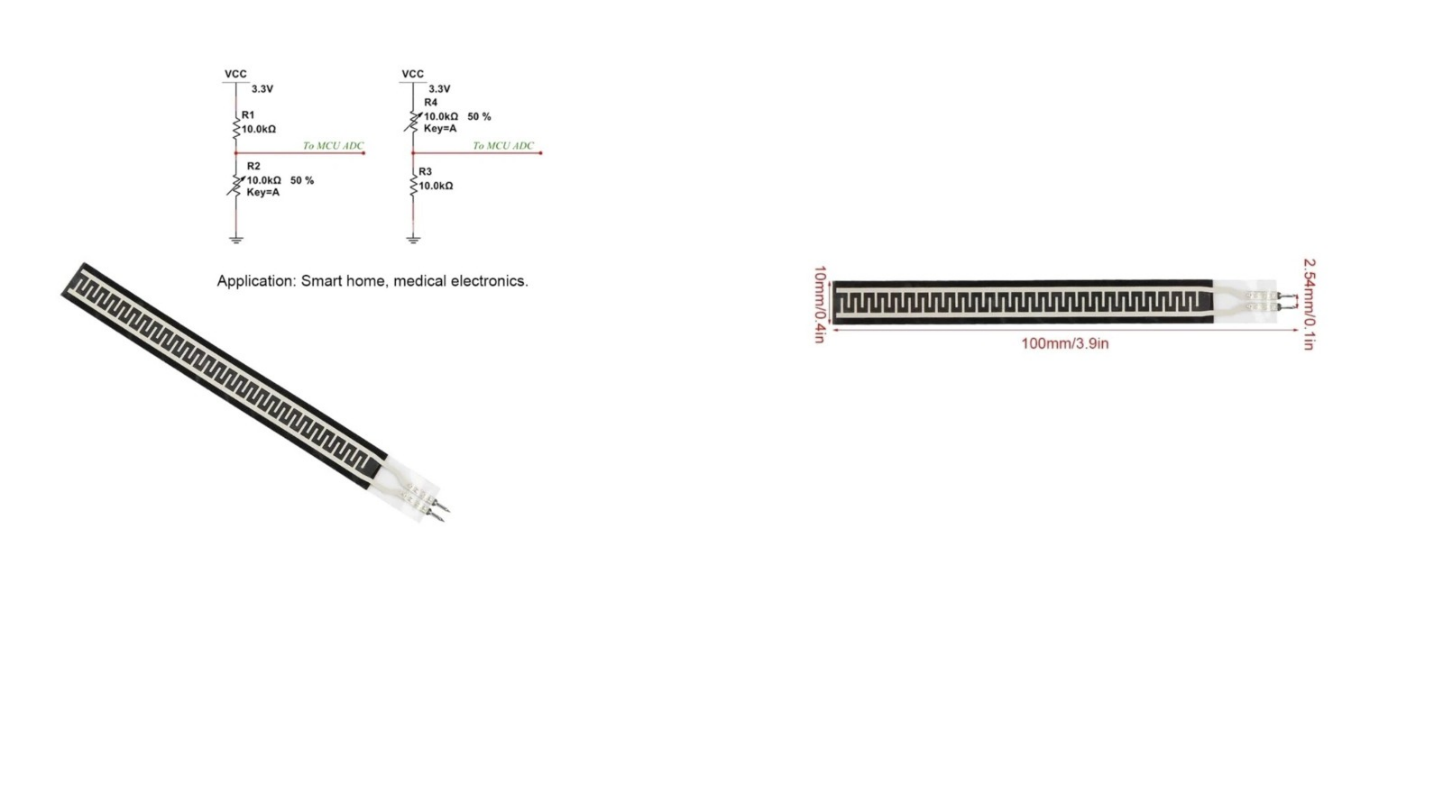
The proof-of-concept (POC) integrates multiple thin-film force sensors FSR-based, membrane-style resistive sensors (RP-C18.3-ST), and PVDF piezoelectric film sensors into a unified multi-channel load-sensing architecture designed to validate real-time pressure measurement, electrical behavior, and signal linearization workflows. Across all sensor types evaluated, the system demonstrates a consistent ability to convert mechanical force inputs ranging from 20 g to 6 kg into measurable analog signals using a combination of voltage-divider networks, Wheatstone configurations, and low-noise ADC acquisition.
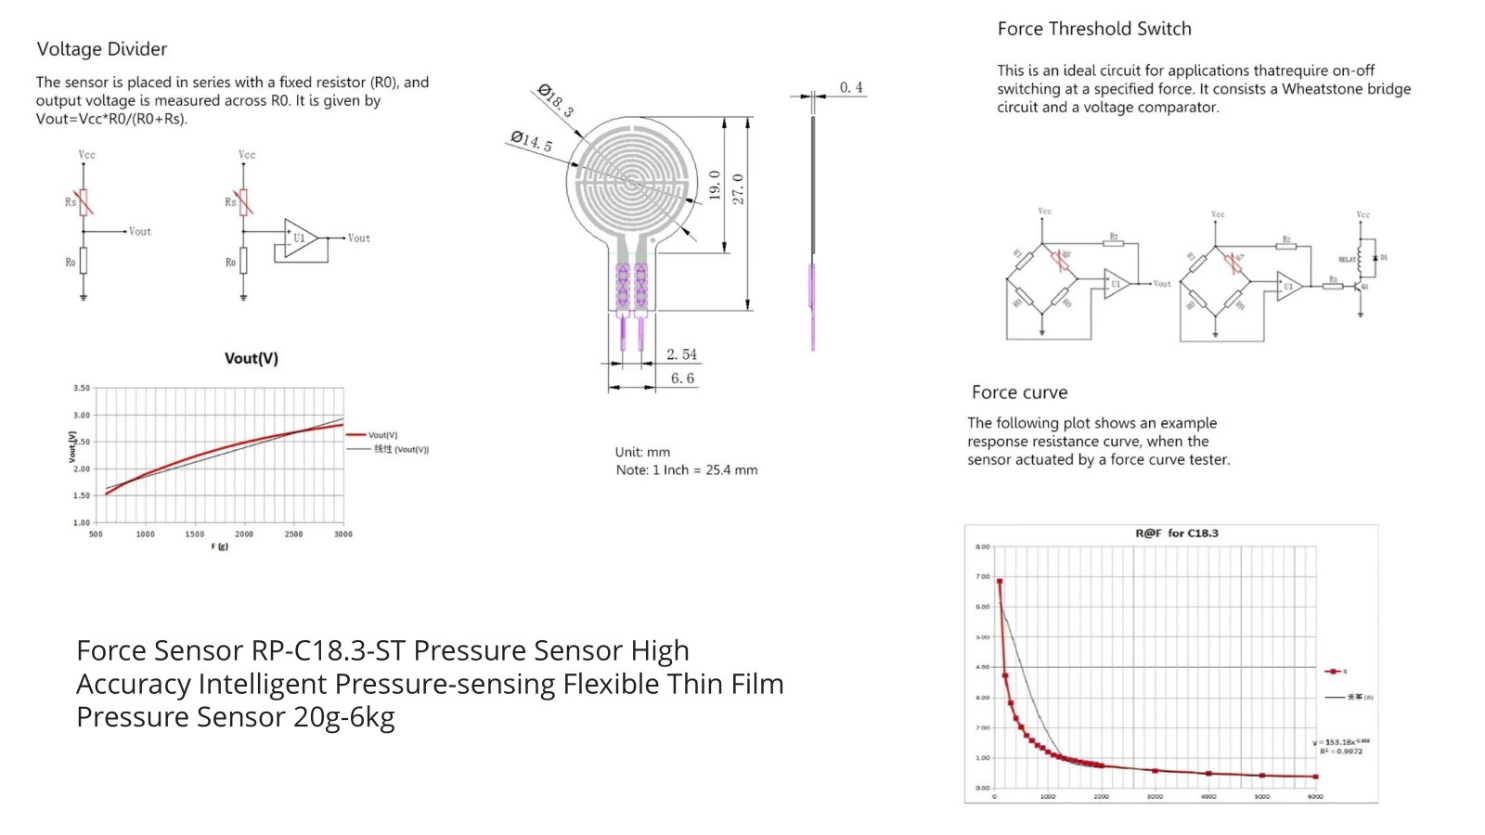
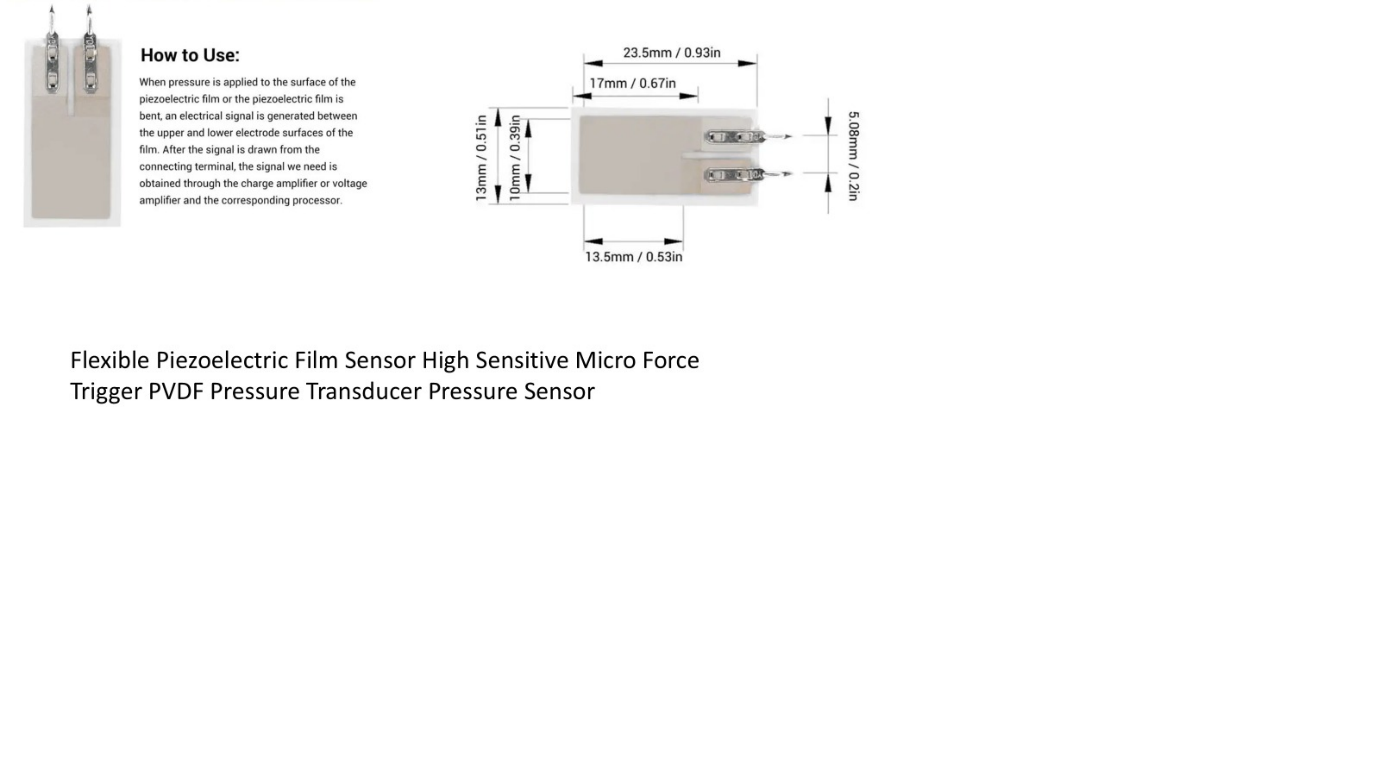
Sensor Electrical Behavior (Datasheet-Validated)
The RP-C18.3-ST FSRs exhibit the expected inverse resistance–force profile, with resistance decreasing from ~10 MΩ at rest to ~200–250 Ω under high force. The PVDF film sensors exhibit polarity-based charge generation when flexed or compressed, confirming their suitability for dynamic or vibration-sensitive applications. Both families maintain mechanical flexibility, thin form factor (<0.5 mm), and rapid response time. The voltage-divider output curves measured in the POC match the theoretical transfer function: V_out=V_cc×R_fixed/(R_fixed+R_FSR ) and closely align with the datasheet Vout–force graphs, confirming that the analog front end captures the nonlinear resistance behavior reliably.
Force Threshold Switching & Comparator Testing
Using the datasheet’s Wheatstone-bridge–based threshold circuit, the platform successfully validated programmable force-trigger thresholds, comparator-based digital switching, and hysteresis behavior during press–release cycles. This demonstrates compatibility with both analog force-profiling and digital on/off applications such as touch detection, mechanical validation, and object presence sensing.
Cross-Sensor Evaluation (FSR vs PVDF vs Long-Strip FSR)
| Sensor Type | Strengths | Experimental Findings |
|---|---|---|
| Round FSR (RP-C18.3-ST) | High dynamic range, scalable | Excellent for static + quasi-static force measurement |
| PVDF Piezo Film | High sensitivity to motion/impact | Accurate for dynamic/contact detection but unsuited for slow static loads |
| Long-Strip FSR | Good for object alignment and rail-contact sensing | Useful for continuous linear position pressure detection |
The multi-channel FSR platform POC demonstrates:
- Accurate analog pressure acquisition using voltage dividers and optional amplifiers
- Predictable sensor response curves matching datasheet force–resistance profiles
- Low-latency microcontroller sampling across four channels
- Cross-sensor consistency and stability under repeated loading
- Integration readiness with threshold switching, linearization, and edge-AI enhancements
- Mechanical and electrical agreement with published specifications
